INTRODUCTION
FEATURES
TUTORIALS
Host a Webserver on your Raspberry Pi
Remote SSH Sessions
ADVANCED
API
How to access Raspberry Pi SSH sessions over the internet
PiTunnel already provides a built-in Remote Terminal, that doesn't require you to setup SSH, however in some situations you may want to manually connect to SSH with your own client, or to use another service that requires SSH for authentiation (for example SFTP).
In this article we will guide you through how to use PiTunnel to allow you to access SSH for your Raspberry Pi from anywhere in the world. We will do this by using the Custom Tunnels feature of PiTunnel. All your Raspberry Pi needs is an internet conection and PiTunnel will do the rest.
What is PiTunnel?
PiTunnel is a service for remotely accessing your Raspberry Pi, and the projects that you build on it. A Device Monitor and Remote Terminal is included, and you can also create your own Custom Tunnels to access services running on your Raspberry Pi.
Enabling SSH
For this article, we assume that you already have SSH enabled on your Raspberry Pi. If not, then please use the command sudo raspi-config to enable it, under Interfacing or Advanced Options.
NOTE: Please make sure that your Raspberry Pi is not using the default password 'raspberry', so that your device is protected from unauthorized access.
Creating a tunnel to access SSH remotely
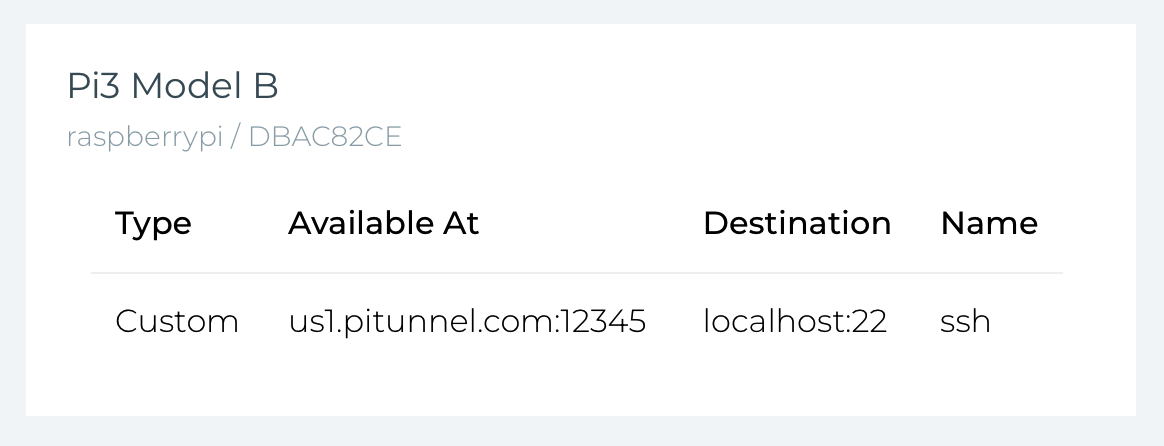
Once SSH is enabled, you need to create a custom tunnel so that it can be accessed through pitunnel.com. A custom tunnel allows you to access your Raspberry Pi SSH through PiTunnel.com with an address like pitunnel.com:12345.
Custom tunnels are created by entering a command in your Raspberry Pi terminal:
pitunnel --port=22 --name=sshIn the above command, 22 is the standard port number used for SSH. For most users, you should be able to enter the command exactly like that.
After you run the command, you will see the following output in your Raspberry Pi terminal:
$ pitunnel --port=22 --name=ssh
Connected to Tunnel Server us1.pitunnel.com, v1
Waiting for Client connection
Testing your tunnel
- Go to the Custom Tunnels page and find out the world-wide accessible address for your tunnel.
- Open your SSH client, and connect to the your "Available At" address. The way you enter the connection details depends on the client you are using. Here are some examples:
-
SSH console client on Mac/Linux:
ssh pi@us1.pitunnel.com -p 12345
Where 'pi' is your Raspberry Pi login username, and '12345' is the port number shown after the ':' in the 'Available At' column of the Custom Tunnels page. -
Putty on Windows:
Host Name:us1.pitunnel.com, Port:12345, Connection type:SSH
Where '12345' is the port number shown after the ':' in the 'Available At' column of the Custom Tunnels page.
PLEASE NOTE:
In the above examples the domain us1.pitunnel.com will depend on the region where you are located in the world, for example,
uk1.pitunnel.com, eu1.pitunnel.com etc.
Please use the exact domain as specified in the 'Available At' column of the Custom Tunnels page.
Making your tunnel persistent
Once you have tested that your tunnel works, you will probably want to make it perisistent. This means that the tunnel will load automatically every time your Raspberry Pi powers on, and stay active even if you close the terminal window.
To make a tunnel persistent, add --persist to the end of the command line options:
$ pitunnel --port=22 --name=ssh --persist
Created Persistent Tunnel

Current Persistent Tunnels:
+----+-------------------------------------------------------+
| ID | Command-Line Arguments                                |
+----+-------------------------------------------------------+
| 1  | --port=22 --name=ssh                                |
+----+-------------------------------------------------------+
For more information about creating and removing peristent tunnels, please see the Persistent Tunnels section of the documentation.
Next: Transferring Files with SFTP